How to Slipstream Windows 8.1 Update 1
One of the horrors of reinstalling Windows is the endless amount of software updates and reboots required to get it secure, stable, and c...
https://hoamb.blogspot.com/2014/04/how-to-slipstream-windows-81-update-1.html

What Is Slipstreaming?
Slipstreaming is a method in which you integrate software updates with the original installation media. That means if you have, say, a Windows 8.1 disc, you can "slipstream" the latest updates into the disc itself, so those updates are installed with Windows instead of afterward. This reduces the number of times you need to update and restart your system, and is also useful if you're installing Windows on multiple PCs or if you have a slow internet connection.PMicrosoft's own command line slipstreaming tools were pretty straightforward to use with Windows XP, but the process changed and became more of a chore with Windows Vista. Fortunately, third-party utilities make slipstreaming less complicated and offer additional features.P
Why Should I Slipstream?
Slipstreaming was originally intended for businesses to make it quicker and easier for IT staff to keep multiple systems up to date, but it's just as useful to end users who frequently reinstall Windows. It keeps all the monotonous updating and rebooting to a minimum and if you use one of the third-party utilities, you can customize the installation to your liking. With WinReducer 8.1, for example, you can bypass the EULA and language screens to make the install go even quicker. You can also remove built-in programs, enter a computer name, set mouse sensitivity, and a whole lot more.PSound familiar? We've actually discussed this before, in our guide to creating a customized Windows 8 installation. We're going to discuss the same tool today, though with a bit more focus on the slipstreaming portion of the process and why you'd do it—so if you're a beginner, you should have no trouble with this guide and can skip the more advanced stuff. Windows 7 users can check out this guide for a Windows 7-based alternative.P
How to Slipstream Windows 8.1 Update 1
- A PC running Windows 8.1
- WinReducer 8.1 and its required third-party software (see below)
- A Windows 8.1 retail disc or official ISO (upgrade discs and ISOs won't work)
- An 8GB USB flash drive to create the installer
- 7-Zip: This is worth having anyway, seeing as it's our favorite file archive utilityP
- ImageX and Oscdimg: These tools are normally included with the Windows Automated Installation Kit (AIK), but GetWaikTools allows you to download them without having to download the large ISO. Select "Waik tools for Windows 8.1" at the Waik tools download screen.
- Resource Hacker
- SetACL: Download the EXE version, not the DLL version
Step 1: Set Up Third-Party Programs in WinReducer 8.1

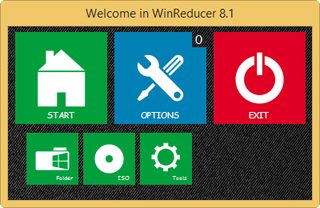
Step 2: Mount Your Windows 8.1 Files
Click on the Start button in WinReducer, then choose where your Windows 8.1 files are located. If you're using a retail disc, copy its contents to a folder on your computer, then click the Folder button in WinReducer to browse to that folder. If you're using a Windows 8.1 ISO, click the ISO button and navigate to your ISO file and mount Windows 8.1 to WinReducer.
Step 3: Download the Windows Update 1 Files
After Windows 8.1 is mounted in WinReducer, you'll see several configuration sections. Go to the System section, then click on the WinReducer Updates Tool button. Choose x86 for 32-bit Windows or x64 for 64-bit Windows, then click on the Update button. Check the box next to "Updates (Update 1) (6)" and any other updates you want to include in the new ISO, then click the Download button. When the downloads finish, back out of the Updates Tool, then enter the path to the updates in the Updates box: WinReducer81\WORK\INTEGRATE\UPDATES\x64 (for 64-bit Windows).Step 4: Apply Other Customizations (Optional)
If there are any other customizations you'd like to make, go ahead and make them now (again, see our more advanced guide for this—otherwise you can skip this step).Step 5: Apply Updates and Create a New ISO
When you're all set, click Finish, then Apply. This step can take quite a while, so you may want to get up and stretch, grab a drink, then come back to it.When the ISO File Creator window finally appears, choose to save file as an ISO, then click Save. After several minutes, your custom ISO will be complete. At this point, you can either burn the ISO to a disc by right-clicking on it and choosing "Burn Disc Image." You can also use it to create a bootable USB flash drive, or save the ISO for future use.
That's it! Now you have a Windows installation disc with all the latest updates slipstreamed right in, making future installations easier and quicker. Keep it in a safe place and enjoy!
Source : lifehacker