How to shoot HDR photos on your iPhone
Your iPhone’s Camera app offers all sorts of neat tricks for taking photos in any environment. For most images, you can adjust the lighti...
http://hoamb.blogspot.com/2014/05/how-to-shoot-hdr-photos-on-your-iphone.html

Why shoot HDR?
Without HDR, you get one of two things: either your subject is perfectly lit but the rest of the image is washed out, or the background of your photo is well-lit but the foreground is darker and slightly out of focus.
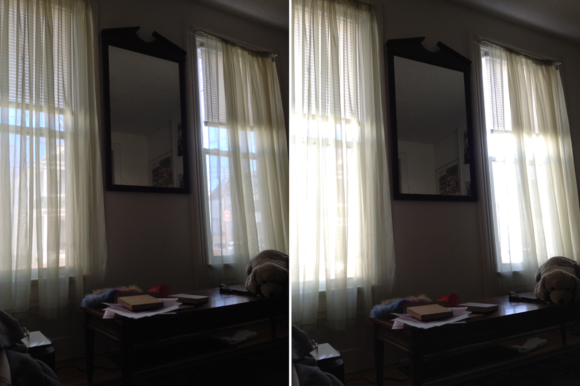
HDR (left) combines several photographs together to capture a well-lit image. If you don't enable HDR (right), lighter elements may end up over-exposed and washed out.
When you enable HDR on your iPhone and then shoot a picture, your device actually snaps multiple images with slightly different exposures for each subject in the frame. It then combines them to create a photo that is well-exposed in all areas.
Shoot an HDR photograph
To shoot a photo with the HDR setting, open the Camera app on your iPhone or iPad. At the top center of the screen, you’ll see a button that reads “HDR Off.” Tap it, and the text turns yellow and reads “HDR On.” (The iPhone 5s also has an HDR Auto option, which we’ll get to in a moment.) Note: If you’re like me and have less-than-dainty thumbs, you may accidentally also focus the iPhone’s camera at the top of the screen; just make sure to refocus your image on your subject before shooting and this shouldn’t be a problem.

When getting ready to shoot an HDR photograph, you want to choose your subject as your focal point. This ensures that the main portion of your image will be properly exposed, and gives the iPhone’s processor more to work with when creating your HDR picture. That said, I recommend testing several focal points when you first start shooting HDR, so that you can create your ideal result.
As cool as it is, HDR is not a fix-all; it can’t create brightness where there is none, like in the very dim light of a restaurant or at dusk. Your device’s flash is disabled when using HDR, but you can use another device’s screen or flash to provide some ambient light; this gives your iPhone more data to work with so that it can add more detail to the shadows.
Automatic HDR (iPhone 5s only)
If you have an iPhone 5s, Apple offers another option in your Camera app’s HDR menu: Automatic HDR. When you enable this, your device’s camera checks to see if there’s enough light on the subject you’ve selected and its background; if there is, it shoots a normal picture; if not, it automatically enables HDR mode.
Viewing HDR images in your Camera Roll
By default, when you shoot an image with HDR turned on, your device keeps both photos—the original unaltered image, and the merged HDR photo. If you’d prefer to not keep the original image, open up the Settings App and go to Photos & Camera > Keep Normal Photo. Disable the switch, and when you next take an HDR photo, only the altered version will appear in your Camera Roll. Personally, I like to keep this enabled, as having both versions allows me to compare and contrast, to decide if I should take a new shot.
To tell the difference between your normal and HDR images in your Camera Roll, look for the HDR image marker—when you tap on an altered image, you’ll see a slightly opaque icon in the upper left corner of the image that says “HDR.”
Source : macworld